Health Advisory

Nothing within this blog should be considered as medical advice and you should always consult your preferred medical professional.

Search This Blog

Showing posts with label coconut oil. Show all posts

Sunday, December 9, 2012

Stained Glass Window Biscuits

A few days ago I smashed my food processor on the ground, I'd like to say it was a fit of pique, but it was simple clumsiness and poor luck. As a result my cooking repertoire has decreased significantly. Every Christmas I make my 9 cup gingerbread biscuits. Turns out they don't go well without a food processor.

This is what we got up to this year. But I'm not posting a recipe because they taste abominable.
[edit 10 December 2012]

Okay I have changed my mind. You deserve a recipe and here it is:

Sian’s 9 Cup Gingerbread Recipe.


Lasts 2-3 weeks in the fridge and can be baked up at any time.

In a food processor bowl add:

9 cups of standard flour

½ cup ground ginger

2 tablespoons cinnamon

1 grated nutmeg

1 teaspoon ground cloves

1.5 cups soft brown sugar

1 teaspoon baking soda

½ teaspoon ground black pepper

Slowly pulse this mix whilst adding:

1 block of butter chopped into squares or 2 cups of solid coconut oil


Once the mixture is well combined and ‘shreddy’ like breadcrumbs slowly incorporate the following whilst pulsing the processor

2 cups molasses or golden syrup

The mixture should come together in a ball, if it does this before the molasses is entirely incorporated then you can stop earlier.

These biscuits should bake in 7-12 minutes depending on oven heat, recommended baking temp is 160 degrees Celsius. I use baking paper on my trays and on my bottom try I double paper it to prevent brown bottoms.

What you don't do.

Melt the butter and syrup together and mix it into the dry ingredients hoping that this lazy method will somehow replicate the original recipe., then when you realise you have run out of syrup and the mixture is still dry add water in the vain hope to rescue your mixture. Then crumble with defeat when you taste the final baked item and it is horrible…


Wednesday, August 22, 2012

I fudged it up


I found a really yummy looking raw fudge recipe on facebook that got me excited, the picture made me salivate with anticipation! The thought of a tasty chocolate recipe that was sort of guilt free had me sweating like a jogger with anticipation. Even more exciting  - I had all of the ingredients on hand. I almost lost the plot. So I immediately got my dates out and started soaking them.


This is the recipe here. Posted by  http://www.facebook.com/IncredibleSmoothies

Ingredients:


 26 medjool dates, pitted and soaked for 20 minutes

 1 cup raw cacao powder

 1/2 cup coconut oil


Directions:


First, make sure you have some soft coconut oil (coconut butter). It doesn’t have to be liquid, but it shouldn’t be white and hard either. Leave it out at a warm room temperature so that it is soft enough to work with.


Then soak 26 medjool dates in water for about 20 minutes. This helps to soften them up so that they are easily blended. Be sure to pit them first.


In a blender or food processor, mix the coconut oil and dates until almost mixed. Next, add the cacao power and blend until completely mixed. The mixture will become thick and form a ball in the blender or food processor.


Press the ball of fudge into the bottom of a small pan and let is sit in the refrigerator for about on hour. The coconut oil will help further solidify the fudge. I topped mine (before putting in fridge, press down lightly) with buckwheat groats and cacao nibs!!

Then cut it into pieces and enjoy 


The recipe comes with this little picture. Looks yummy right?


The problem with some recipes is that they don’t always turn out as expected, I suspect a combination of happy go lucky measuring and ingredient differences resulted in a mixture that resembled cow pats, cow pats that wouldn’t set. After 24 hrs in the fridge I decided to give the freezer a go, surely if I got it cold enough it would harden up? Right? Right????


 No.

 One week in the deep freeze and the mixture was still too soft to use for anything. I almost despaired. Then I had a brainwave! 2 blocks of dark Ghana chocolate, a big old mess and a lot of fun later I had some delectable, dairy free, nutritious one hit wonder truffles. 


Nom!


So let this be a lesson to you, ALWAYS follow the recipe gram for gram and be prepared to innovate….


Wednesday, July 4, 2012

I love Muesli... or do I?


I really love muesli, the perfect muesli is a crunchy, chewy delicious start to the day. With the right combination of berries, yogurt and juice it could almost be considered manna from the heavens. I also hate muesli, let me tell you the ways!


  • I hate paying $8 for a tiny box that is mostly packaged air, so that pouring yourself a bowl of muesli leaves you with exactly enough muesli for 1 and a half maybe 2 more bowls if you are lucky.
  • I hate that when the box says ‘delicious Almond and Blueberry’ you have to engage in a culinary ‘Where’s Wally’ to find the 3 almonds they hid in the box
  • I hate that when the box says ‘delicious Almond and Blueberry’ the blueberries are almost certainly currants that have been dyed and flavoured.
  • I hate how much sugar is in most pre-packaged mueslis
  • I hate the marketing which paints something that is nutritionally uneventful as some sort of miracle superfood. Most commercially available mueslis share more in common with a box of candy than a box of healthy grains.
  • I hate muesli fillers like textured processed flakes and chunks that bulk up boxes of muesli for low cost and low nutrition.
  • Mostly I hate papaya. Papaya is something that muesli makers put in their boxes to torture me. A perfectly good box of muesli can be ruined by small sticky, sickly sweet globs of papaya.


I have tried a variety of times to make my own muesli, but always had fairly lack lustre results, often ending up with a combination of overtoasted and raw muesli. The heartbreak of wasting so many ingredients on muesli misfires finally wore me down and I stopped.

Until I unearthed my old harvest maid dehydrator and a recipe for gRAWnola that tickled my interest. A friend of mine follows a raw vegan blog and while raw vegan has never been a food jag that appealed to me, a lot of the recipes used by raw vegans are excellent examples of nutrient dense food on a budget so hearing about healthy, tasty granola that can be made in the dehydrator made me think of muesli.

Without further ado I emptied out the dry goods cupboard and threw together the most delicious muesli I have ever had. Even better, for the same cost of a box of premium muesli I made almost 5 litres of muesli which should last us a good fortnight or more.

This is what I chucked together

2 cups of organic buckwheat groats
.75 cup of unhulled sesame seeds
1 cup of pumpkin seeds
2 cups sunflower seeds
2 cups of oats
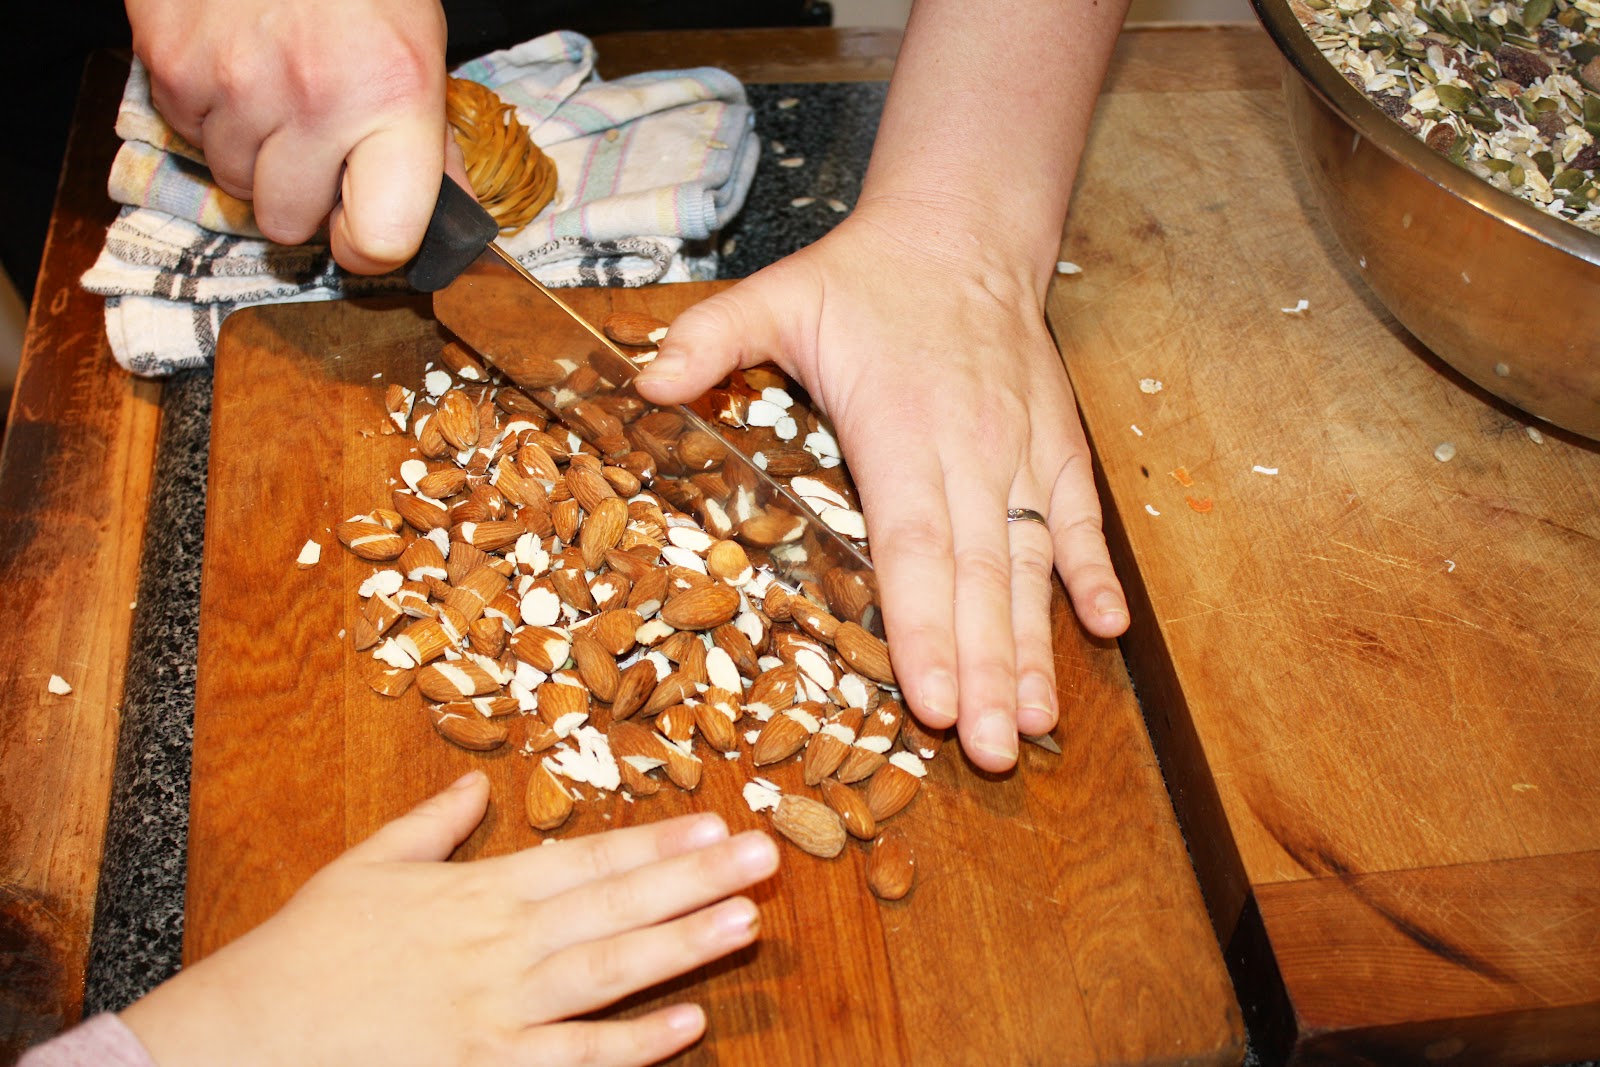
1.5 cups of coarsely chopped almonds
1 cup chia seeds
1 cup sultanas
.5 dried apricots diced up
1 cup of dried cranberries
1 cup linseed
1 cup shredded coconut
2 diced apples
3 tamarillos (I just squashed the flesh out in chunks)
1 heaped teaspoon of cinnamon
1 teaspoon of ginger powder

Then I melted .5 cup of virgin coconut oil and .5 cup of honey (please note, honey is not vegan) together before tossing the mix together to ensure an even coating. You could use juice concentrate, molasses, agave, maple syrup, pureed date or really anything you please as a sweetener and any oil as a binder. Important to note that all of these proportions are approximate, in most cases I literally just cleared out what was leftover in the cupboard.

I layered it onto my dehydrator and then had it on level 2 overnight.

The result was delicious!!!

Buckwheat groats form the basis for this recipe.

Chia seeds are nutrient dense little powerhouses

An excellent example of safe almond chopping

Into the bowl they go

Mix it all up


Kids love the mixing
Cinnamon and Apple
Cranberries are a tasty treat but can be high in sugar


Warming the honey and coconut oil together, the smell is heavenly.

Sticky fingers!

A nice thin layer is best
Et voila!


Tuesday, June 12, 2012

Icecream - Good for what ails you


My big boy is going through a notoriously picky eating stage, he has gone from being an adventurous devourer of everything to a selective grazer. I try not to stress out about it, everyone tells me it is a totally normal stage relating to palate and autonomy but I still get anxious and worry about nutrition. I swore I would never become one of those mothers who sneakily find 101 ways to hide spinach in everything but I am heading in that direction.


One thing that he never turns down is icecream! As a result I have developed a series of cunning ‘icecream’ recipes that help give him his 8+ a day. Currently he is avoiding meat and has an uncanny ability to detect and discard it. Which has led me to worry about his iron stores, he has a been a bit pale and tired lately and when I checked his eyelids they were a little pale so I decided to up his Vitamin C and iron intake. A tricky proposition when he has become bored of citrus fruit and refuses to eat his greens. As a result I have come up with some delicious smoothie recipes that become even more delectable icecreams.

To make these you need a blender and an iceblock mould as well as some popsicle sticks.. oh and a freezer.

Green Martian Pops – rich in vitamin C and iron

2 kiwifruit
Bunch of parsley
Kale if you have it
1 teaspoon spirulina powder
½ banana
1 teaspoon of manuka honey
Enough water to make it all blend

It’s important for optimum iron absorption to avoid adding milk or dairy products, I punched up the iron value by adding some floradix and the kiwifruit which is rich in vitamin C helps to absorb the maximum amount of iron. The banana helps make everything creamy and the honey makes it more palatable as well as making the ice crystals smaller. Sugar inhibits freezing which makes the end result easier to eat. A lot of people worry about savoury greens going into a sweet icecream but it’s amazing how well they mix in and how yummy they taste.

Coconut Yummies – a neat way of getting healthy fats in

1 can coconut cream
1 tablespoon virgin coconut oil
1 whole banana
1 teaspoon cinnamon
1 teaspoon manuka honey
8 fish oil capsules or 2 teaspoons of fish oil
½ can mango slices or one whole fresh mango (optional)

These sound a little revolting but something about the coconut cream, banana and cinnamon manages to emulsify and obscure the fish oil. Fish oil is great for little brains and this is a handy way of getting a dose in. The fish oil I get is tested for mercury and includes Vitamin D so is a fabulous immune booster in the winter months. Cinnamon is a great blood sugar regulator as well. If you have a child with gut issues then this is a great smoothie recipe to incorporate slippery elm which helps to line and protect the GIT

Real Fake Jellytip – my son loves these because they taste kinda like jellytip but oh so much better for you. Rich in vitamin C!

3 handfuls of frozen raspberries
1 teaspoon of honey
½ cup beetroot juice
2 juiced oranges
Zest and juice of one lime

I use this mix to make red ‘tips’ on other flavours. It’s a great way of bringing back a waning interest in other icecream flavours. It is a tangy delicious combo that I find hard to resist myself.

Tummy bug pops – gentle on sore tums and great for rehydrating along with fluids

1 can green coconut water (not to be confused with coconut milk)
1 banana
1 handful of blueberries
1 teaspoon squeezed juice from some grated ginger

Ginger helps with nausea and green coconut water is ideal for rehydrating because of its similarity to blood plasma. Green coconut water is brownish coloured, and not at all creamy, it also tastes a bit like arse but made into a smoothie it’s much more palatable. Banana is gentle on the tummy and helps with tender bellies, it is part of the B.R.A.T diet and suitable for reintroducing solid foods after a bout of the guts. Blueberries are a powerful antioxidant as well as a good source of potassium which is essential when rehydrating. These are great to make up and then have in the bottom of the freezer for cases of dire rear.

Chocsicles – a probiotic powerhouse

1 banana
1 avocado
½ cup kefir or yoghurt
1 heaping teaspoon raw cacao
1 teaspoon manuka honey

Probiotics are great at preventing illnesses and restoring balance, fabulous for taking after a course of antibiotics. Freezing probiotic foods don’t kill all of the probiotics – simply slow them down. There is a bigger benefit of simply feeding the smoothie but iceblocks are a really handy way of doing it.

These recipes are all just ideas, of course there are thousands of variations you can use. I often make up smoothies with whatever is going and freeze them up in batches. Changing the colours and flavours on a regular basis keeps him interested. These iceblocks are usually served for dessert and in the bath! Sometimes they become impromptu wall crayons but most of the time they are devoured with glee.


Friday, March 16, 2012

Coconutella


After my spreadable butter success I have realised that making spreadable spreads is addictive. So is Pinterest. Finding recipes on Pinterest and making them is addictive. The nutella microwave mug cake recipe I found on pinterest is so addictive that it’s dangerous. I am not a massive nutella fan, but I did end up buying it simply to make the microwave mug cake. I’m that kind of person, I have an addictive kind of personality. I was pretty excited about my delicious nutella microwave mug cake, untilI read the ingredients list on Nutella.

Sugar, vegetable oil, hazelnuts (13%), cocoa powder (7.4%), non-fat milk solids, emulsifier (soy lecithin), flavour (vanillin)

Just in case you are wondering the vegetable oil listed is palm oil, and since there is nothing mentioning that it is fair trade I’m going to go ahead and assume that it is not fair trade and that it is also highly refined palm oil. If you’re wondering why the use of palm oil bothers me check out this info on orang-utans.
Finding out that a supposedly healthy spread is only 13% hazel nuts and primarily sugar and palm oil is not a happy moment. In saying that I would happily go without, but my husband has a bit of a crush on nutella and I feel he has been having a closed doors affair with it behind my back because the tub I bought was full one day and almost empty the next. My microwave nutella mug cake has nothing to do with it of course…

Luckily, Pinterest provided me with a solution in the form of a recipe for home made nutella. I was excited! Until I realised I didn’t have chocolate or hazelnuts in the house. I also did not have milk powder… and come to think of it, how healthy is chocolate anyway? Back to the drawing board.

I decided to make up my own recipe based on ingredients I had, hopefully not a recipe for disaster. I muddled around with ingredients I had in the fridge, I tried to stick to healthy or whole foods. The resulting spread was not much like nutella (lacking the essential hazelnuts and chocolate) but instead tasted like a creamy coconut rough spread. It was scrummy! Here is the recipe.


Coconutella Recipe

1.5 cups of toasted almonds
3 heaping teaspoons of cocoa powder
¾ cup of milk
50gms of butter
50gms of coconut oil, maybe less. I can’t be sure. It was a chunk.
½ cup honey

These measurements are all approximate, I tend to just lug things in and hope for the best. Depending on the temperature of your fridge you may want to play with the ratios a bit. More milk will make it softer and more butter or coconut oil will make it firmer.

I toasted the almonds until they were golden, okay that’s a bit of a lie, I almost burned them. But they were still nice. Then I used my coffee grinder to grind them as fine as possible. After that I put the almonds in my blender with the coconut oil, honey and butter. In a saucepan I heated up the milk with the cocoa powder until it was bubbling around the edges. It’s important to heat the cocoa powder so that it doesn’t taste awful and goes a nice dark colour. I poured the hot milk over the mix and blended it. And blended it. And blended it… and then my machine started smoking, so I stopped. The resulting mix was quite liquidy but set pretty well in the fridge. The coconut oil had given it an amazing taste, like bounty bars or coconut rough. Not at all like nutella but something familiar and chocolatey.


I consider it a success.

Thursday, March 15, 2012

I Can't Believe it's Butter.


I have a butter problem, I love butter, but that is not the problem. The problem is that I like my butter to be spreadable. Because I don’t like spending $7 on 300gms of boutique super soft butter I usually end up buying margarine. Margarine is not butter, it is not even remotely like butter. But at 6.30am when everyone is hungry and we are in the middle of a Dunedin winter which turns even the semi soft butter mostly rock hard, I want spreadable ‘butter’ and I do not want to play microwave roulette with a small knob of greasy butter which will either still be hard after 10 seconds or turn into a pool of melted sadness.

And then of course there is the health aspect. Half of the internet tells me that butter is seriously bad for you and will kill you in the end, and the other half of the internet inform me that margarine is a silent killer and not only does it kill turkeys it’s bound to kill me in the end too. If I had to pick a grisly death by spread I’d take butter any day of the week, yet week after week it is margarine that I put in my supermarket trolley with a sigh of regret. The obvious option is to not use either. However, an addict doesn’t take kindly to having her diet of toast threatened.

I’m convinced that margarine is not actually a food, I feel that it has another unfulfilled and vastly more successful existence as axel grease or weed killer.  Yet it is supposed to be the healthier choice.  At least that is what the advertising tells us with lovely little slogans such as ‘zero cholesterol’ ‘zero saturated fats’. Yet margarine has a dirty little secret. Not only is it not tasty like butter, it’s not all that good for us either.  Margarine for the most part is hydrogenated fat, which is not good. Hydrogenated fat is also known as ‘transfats’ and has been shown to increase the "bad" cholesterol (Low Density Lipid), and to lower the "healthy" (High Density Lipid) cholesterol. In addition to this, transfats make our blood platelets stickier, which is a component of heart disease. One tablespoon of margarine has approximately 3 grams of trans fat and 2 grams saturated fat. However on the upside margarine also has higher levels of polyunsaturated and monounsaturated fats which scientists tell us are good.

While butter is essentially a saturated fat and is therefore, well… fattening, it also has a load of good components which can make reasonable amounts of it part of a healthy diet. Butter contains lauric acid, lecithin, beta carotene, antioxidants, selenium, Vitamins E, D and K, conjugated linoleic acid, arachidonic acid and anti stiffness factor. It is also delicious. And remember at the beginning of the paragraph I said that butter was fattening? Think again! Butter is mainly comprised of short and medium chain fatty acids which are not stored in the adipose tissue, but are used for quick energy instead. Proponents of butter attribute it with such qualities as being a cancer preventative, a muscle builder, and immune system booster and good for childrens brain development. Aside from this it is important to remember that butter is one of the most saturated fats around, which scientists tell us is bad.
When it comes to bean counting though they are both calorie for calorie equivalent.

So where do I stand on the butter vs margarine evil slow death instigator showdown? Neither is particularly great for your health in terms of saturated fat and cholesterol but in terms of adjunct nutritional value butter beats margarine around town. Did I mention it was delicious? All of this however does nothing to solve my spreadable butter problem. This recipe however, does, and it is amazing.
Homemade Spreadable Butter
1 part butter
1 part  healthy oil (I used ricebran oil)
Soften your butter and chop it into your food processor, beat it until it is creamy and pale, slowly add your oil in a thin stream until it is completely incorporated. Scoop into wide necked glass jars and refrigerate. I divided mine into 3 handy sized jars and froze 2 of them for future use. 


Magic.
A little note on rice bran oil, it is often recommended as a healthy high smoke oil. The truth is a little more complex than that. Rice bran oil  contains 7 grams of monounsaturated fat, 3 grams of saturated fat and 5 grams of polyunsaturated fat per tablespoon it also contains components of vitamin E that may benefit health.
Scientists found a compenent of ricebran oil (tocotrienol rich fraction)  not only lowered cholesterol significantly  but also boosted the activity of liver enzymes that clear toxic substances from the liver. However, the flipside of this is that ricebran oil is often subjected to intense processing using chemicals and heat. To get the benefits of ricebran oil it needs to be cold pressed, the primary brand of ricebran oil is not cold pressed. They advertise as cold filtered but this is not the same thing. However for high heat cooking and baking I still use ricebran oil because it has a nice buttery flavor and it is cheap. To make this butter healthier the best option would be to use olive oil.

Some other healthy fats that can replace butter and bulk processed vegetable oils are:


  • Red palm oil - unrefined and fair trade please.
  • Fish oils  - mercury tested please
  • Coconut oil - unrefined and organic please
  • Seed and nut oils