Health Advisory

Nothing within this blog should be considered as medical advice and you should always consult your preferred medical professional.

Search This Blog

Showing posts with label olive oil. Show all posts

Friday, March 16, 2012

Pediculosis capitis – say what now?


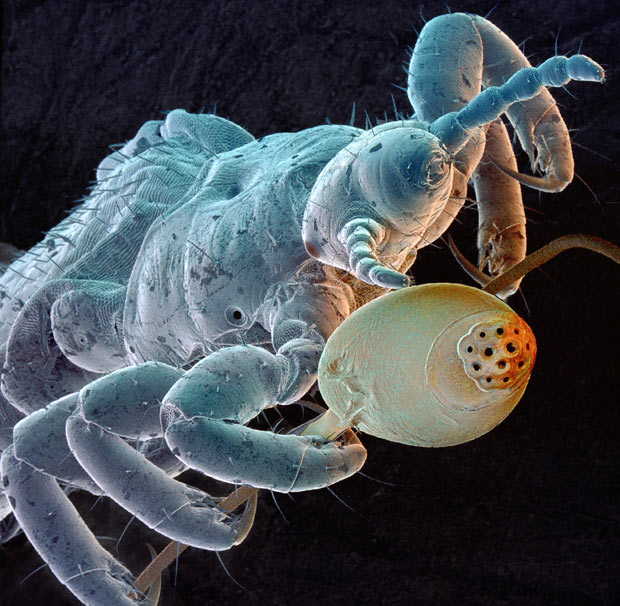
Headlice are ‘orrible. They are the bane of any parents with children who engage in social activities. They are very small parasitic wingless insects that live on the scalp of human beings. They have six legs, each with strong claws to hold tightly to the hair or scalp and range from near transparent white to dark brown. Head lice lay eggs called Nits.  The Nit eggs are yellowish white and oval-shaped.  Nits are attached to the shafts of the hair close to the scalp so they are kept warm in order to incubate. Ewwww. The eggs of head lice hatch in about 7-10 days. The egg-to-egg cycle is about 3-4 weeks. The eggs are resistant to most treatments and cannot be washed out – you can see what we are up against. 

Headlice, not the next great toy


Treating once will only kill the live nits and because they transfer effectively from head to head contact, clothing and linen, a deep infestation can be almost impossible to clear.

A little note came up at preschool a few weeks ago, ‘WARNING WE HAVE NITS’ and they even helpfully put up a laminated example of a real nit and a real louse.  I instantly got the heeby jeebies. I felt itchy right away but couldn’t itch myself for fear of looking like a lice infested hobo. My head had been itchy anyway due to the 3 month post partum moult but now with every itch I imagined a horde of shiny little bodies crawling over my head. Every night I badgered my husband to check me for lice and I have been watching my son like a hawk to see if he itches.
With lice, prevention is always ALWAYS better than cure, but before you assume all the louse ridden children are poor, undernourished and unclean you should know that headlice prefer clean scalps and nice juicy children (okay I just invented that last supposition but it makes sense). Since my son is clearly nit free I can safely assume he has a nice grubby scalp


How do you prevent headlice?

Aside from having dyed hair (not an option for most kids) and leaving your hair dirty (probably a preferred option with most kids) there are a couple of things you can do to make your childs head less tenable. With short hair, putting gel or product in it before your children are likely to be in head lice contact is a cunning move and with long hair, tight plaits or tied up hairstyles with hairspray are effective too. Another tactic is to make sure children are not sharing hats or hairties.

Here is a recipe for home made, louse resistant, chemical free hairgel/spray you can make for pennies.

Manuka Hair Gel Recipe
2 teaspoons of powder gelatine (not heaped)
300ml warm water
1 tablespoon white vinegar
12 drops of manuka oil – you can also use teatree and add some lavender oil if you wish.

Mix the water, vinegar and gelatine together until dissolved and wait until it has set. Once it has set put it in your blender and blitz it whilst adding your essential oil. It should come out smooth like hair gel. To make it into a hairspray dissolve ½ a cup in 300ml of water approx and put into a spritzer bottle.

Ideally this will stop the lice in their tracks but assuming the lice are more persistent than that and you end up with an infestation you can still get rid of them without something toxic or nasty. In past days children would have been simply lined up at school and had their head dunked in a bucked of kerosene This is not to be recommended and can seriously burn the scalp.

First off how do you know if your child has lice?

Sometimes it can be hard to know. Most kids will be itchy and irritable, there may be red spots on their scalp which can become infected.It’s also possible for your child to have a headache, general malaise and even a rash or allergic response such as hives. In many cases however there may be no obvious signs of an infestation.

To check for lice you will need a comb and a bright light such as daylight or a torch to check the scalp. The nits or eggs are little white dots that sit on the hair shaft and the lice are little brown critters that dash across the scalp. Wetting the hair immobilises them and can make it easier to spot them. My mum used to sit me out in a sunny spot and check my scalp and pop any lice she found. All we needed were chimp suits. As an interesting note, girls are more prone to headlice than boys are. 


So what do you need to kill the headlice?

Some white vinegar or apple cider vinegar
Some coconut milk (optional)
Some oil, olive or almond are best
Some teatree oil or manuka oil.
A nit comb

To treat headlice you need to commit to doing a few treatments over a 12 day period, this is because any nits or eggs you miss will hatch and start the whole cycle again and it’s easier to get them all in one fell swoop than to wait for each successive reinfestation. You also need to do every one in the house and you need to do the bedding and recently used clothes as well.

The first step of the treatment is to douse the hair in vinegar and leave for about half an hour, either with a spritzer bottle or using a flannel soaked in vinegar. A headband around the forhead and over the ears like a skier is a good way to stop drips from getting in eyes. It can stink like billy’o! Vinegar breaks down the glue which holds the nits onto the hair and can also help weaken or kill the lice.

The second step of the treatment is to mix 1 part coconut milk with 1 part oil and some drops of teatree oil and smother the whole head in this mix. The coconut milk makes it smoother and easier to comb later on. You need to leave this mix in for as long as possible. You can glad wrap it overnight if your children are a bit older and will tolerate it but for little children you may just have to deal with a goopy head for as long as you can manage. Even a little hat can hep the mix stay on. This blend smothers the lice and immobilises them.

The third step is to patiently comb all of the nits out using a nit comb, the easiest way is to divide it up into sections and comb it out piece by piece using an absorbent towel to collect the oil mix and hopefully the dead lice. Once this is completed it’s time for a nice hot hair wash and condition with a final rinse of vinegar (which makes you hair lovely and soft anyway).

If you don’t have oil and coconut milk you can use conditioner with a few drops of teatree or manuka oil in it. This is easier to comb and is just as good at smothering, but it is not terribly natural. It depends entirely on what hair regime you have.

Another tip is if your child has long hair and you have a straightening iron you can use the hot iron to straighten their hair and sizzle all of the headlice. You have to know that your child can sit still though… I cannot stress how important that is.


The fourth step is just as important, and that is to wash all of your linens, preferably on a hot wash with some teatree or manuka oil and then out through a hot cycle in your dryer or hang on the line for at least 2 days. Anything that can’t be washed can be bagged up and sealed which starves the little critters to death.

You can also get electric combs which zap them to death, which is significantly less fussing and bother especially with little children. However they don’t kill the nits so you will need to do it every couple of days for a fortnight and they are also expensive!

I forgot to mention the last part of the cure, a glass of wine to help soothe your nerves after the ordeal. This is possibly the most essential step.

Thursday, March 15, 2012

I Can't Believe it's Butter.


I have a butter problem, I love butter, but that is not the problem. The problem is that I like my butter to be spreadable. Because I don’t like spending $7 on 300gms of boutique super soft butter I usually end up buying margarine. Margarine is not butter, it is not even remotely like butter. But at 6.30am when everyone is hungry and we are in the middle of a Dunedin winter which turns even the semi soft butter mostly rock hard, I want spreadable ‘butter’ and I do not want to play microwave roulette with a small knob of greasy butter which will either still be hard after 10 seconds or turn into a pool of melted sadness.

And then of course there is the health aspect. Half of the internet tells me that butter is seriously bad for you and will kill you in the end, and the other half of the internet inform me that margarine is a silent killer and not only does it kill turkeys it’s bound to kill me in the end too. If I had to pick a grisly death by spread I’d take butter any day of the week, yet week after week it is margarine that I put in my supermarket trolley with a sigh of regret. The obvious option is to not use either. However, an addict doesn’t take kindly to having her diet of toast threatened.

I’m convinced that margarine is not actually a food, I feel that it has another unfulfilled and vastly more successful existence as axel grease or weed killer.  Yet it is supposed to be the healthier choice.  At least that is what the advertising tells us with lovely little slogans such as ‘zero cholesterol’ ‘zero saturated fats’. Yet margarine has a dirty little secret. Not only is it not tasty like butter, it’s not all that good for us either.  Margarine for the most part is hydrogenated fat, which is not good. Hydrogenated fat is also known as ‘transfats’ and has been shown to increase the "bad" cholesterol (Low Density Lipid), and to lower the "healthy" (High Density Lipid) cholesterol. In addition to this, transfats make our blood platelets stickier, which is a component of heart disease. One tablespoon of margarine has approximately 3 grams of trans fat and 2 grams saturated fat. However on the upside margarine also has higher levels of polyunsaturated and monounsaturated fats which scientists tell us are good.

While butter is essentially a saturated fat and is therefore, well… fattening, it also has a load of good components which can make reasonable amounts of it part of a healthy diet. Butter contains lauric acid, lecithin, beta carotene, antioxidants, selenium, Vitamins E, D and K, conjugated linoleic acid, arachidonic acid and anti stiffness factor. It is also delicious. And remember at the beginning of the paragraph I said that butter was fattening? Think again! Butter is mainly comprised of short and medium chain fatty acids which are not stored in the adipose tissue, but are used for quick energy instead. Proponents of butter attribute it with such qualities as being a cancer preventative, a muscle builder, and immune system booster and good for childrens brain development. Aside from this it is important to remember that butter is one of the most saturated fats around, which scientists tell us is bad.
When it comes to bean counting though they are both calorie for calorie equivalent.

So where do I stand on the butter vs margarine evil slow death instigator showdown? Neither is particularly great for your health in terms of saturated fat and cholesterol but in terms of adjunct nutritional value butter beats margarine around town. Did I mention it was delicious? All of this however does nothing to solve my spreadable butter problem. This recipe however, does, and it is amazing.
Homemade Spreadable Butter
1 part butter
1 part  healthy oil (I used ricebran oil)
Soften your butter and chop it into your food processor, beat it until it is creamy and pale, slowly add your oil in a thin stream until it is completely incorporated. Scoop into wide necked glass jars and refrigerate. I divided mine into 3 handy sized jars and froze 2 of them for future use. 


Magic.
A little note on rice bran oil, it is often recommended as a healthy high smoke oil. The truth is a little more complex than that. Rice bran oil  contains 7 grams of monounsaturated fat, 3 grams of saturated fat and 5 grams of polyunsaturated fat per tablespoon it also contains components of vitamin E that may benefit health.
Scientists found a compenent of ricebran oil (tocotrienol rich fraction)  not only lowered cholesterol significantly  but also boosted the activity of liver enzymes that clear toxic substances from the liver. However, the flipside of this is that ricebran oil is often subjected to intense processing using chemicals and heat. To get the benefits of ricebran oil it needs to be cold pressed, the primary brand of ricebran oil is not cold pressed. They advertise as cold filtered but this is not the same thing. However for high heat cooking and baking I still use ricebran oil because it has a nice buttery flavor and it is cheap. To make this butter healthier the best option would be to use olive oil.

Some other healthy fats that can replace butter and bulk processed vegetable oils are:


  • Red palm oil - unrefined and fair trade please.
  • Fish oils  - mercury tested please
  • Coconut oil - unrefined and organic please
  • Seed and nut oils


Friday, March 5, 2010

Boobs cont..

In the early days of breastfeeding I wandered around the house with no top on and the flaps of my maternity bra open like some weird mother goddess figure or bondage queen. It seemed like no longer had I put my boobs away after one feed that a grabby little mouth wanted to get at them again. They were sore, really sore and worn out poor tired boobs. The most important things bar nothing to prevent and heal sore nipples is correcting and perfecting the latch however to help you continue breastfeeding when the damage is done Here are a few things that can help pep them up again:


Lotions Potions and Recipes for Sore Boobs

Shower Oil

In the early days when I showered I had to hold my hands over the stinging nipples as the hot water really hurt them. To protect them I rubbed oil on them before getting into the shower and this really helped protect them as well as keep them supple.

1 cup extra virgin olive oil
4 drops of Lavender oil

Mix and place in a light tight container and store in a cool place. Great for boobs and preggy bellies.

Calendula Infused Oil

Calendula or Pot Marigold is a really common flower. Often planted alongside other plants to repel pests it has wonderful healing properties. If you don’t have any growing in your yard you can get seeds or plants from most garden shops and they are very easy to grow, mine grows like a weed. There are quite a few commercial calendula nappy or nipple creams, but they can be costly. If you infuse the calendula flower in oil you can use that oil on it’s own as a salve or lotion or include it is some other recipes like my bum balm.

3 cups of flowers
1 litre of extra virgin oil (any other carrier oil would be fine)

Pick as many flowers as you like don’t worry about picking too many, picking them simply encourages more growth. Make sure they are nice dry specimens without rain or dew on them. Spread them on news print or an old dry towel in a warm place out of direct sunlight. Airing cupboards or spare bedrooms are great. Once the flowers have wilted and are almost dry place them in a clean glass jar and cover with oil. Make sure there are no air bubbles or moisture trapped. After a week the oil should have infused and you can discard the flowers or turn them into a poultice. The resulting oil should be orange and can be used on skin, abrasions, bruises, rashes and blemishes.

Calendula Poultice

I used this poultice directly on my nipples to aid in healing. It really helped soothe and close the cracks I had. Either use the flowers left over from Calendula infused oil or get some fresh flowers and remove the petals. Cover the fresh petals with oil and macerate. Keep refrigerated for up to a week and when you want to use warm the flowers and apply to your breast around the nipple. Be sure to rinse of thoroughly before feeding the boob monster.

Warm saline soak

1 cup boiling water
1 tsp salt

Mix together and place in a wide bowl, dangle your boob in as hot as you can stand it. It may sting a little if you have cracks but it can also be quite soothing. Pat dry.

Cabbage Leaves

Keep a few large cabbage leaves cool in the fridge, if you have engorged breasts slip them into your bra. Don't over do though as it can reduce your milk supply. I would not recommend this course of action if you have supply issues.

Breastmilk

My midwife swears by this and she is right, squeeze a little breastmilk from the affected nipple and rub it on the cracked bit and let it dry.

Sunlight

Can't recommend it enough, it's free, healthy and quite calming as well. Gotta get that vitamin D

Hottie or Wheat Bag

If you have blocked ducts, engorged breasts or sore nipples a hottie or wheat bag can really soothe those enraged nungas.

Some other things that help...

Let bubs suckle the nipple which is less sore as the first suckle is the most active. Keep switching poitions with each feeding, thus avoiding pressure from the baby's mouth on the same part of the breast. Do not for gods sake stop feeding, boobs heal by frequent nursing with the passage of time. Even if it is cracked bleeding or infected your baby will not be harmed by suckling from you.

Exposure of nipples and breasts to air prevents growth of thrush. Avoid wearing bra for long hours of the day instead wear nursing bras with flaps. Then you too can look like a strange mother goddess or bondage queen....


Wednesday, March 3, 2010

Bums


Babies bums are very very cute, I just love those dimples and chubby litle thigh rolls. We like to keep them cute and pink and soft and happy, however being jammed in nappies all day means they are sometimes pretty grubby and they can also get a bit rashy. I have been really lucky with my wee monster, so far no nappy rash, I consider myself fortunate as nappy rash can be a real hassle – not to mention painful and sore on sad baby bums.


 Nappy rash can be caused by a number of things including diet, natural sensitivity, allergies and wet/soiled nappies so there is no surefire cure as far as I know. As a preventative, experts advise plenty of nappy free time and frequent changes amongst other things. People who use elimination communication often state that an absence of nappy rash is one of the best things about it.

 I feel that I have been able to avoid nappy rash by using a cloth nappy made of bamboo which is naturally antibacterial and by avoiding commercial wipes. I had been using an unscented version of commercial wipes for the first month of my first son's life but I just kept feeling there had to be a better ways even the unscented ones seem to have a load of unnecessary chemicals and they really aren’t that cheap either. I had been using chux cloths on the the advice of another mum but found they seemed to disintegrate in the wash pretty quickly and I am definitely NOT into hand washing if I can possibly avoid it – who has time? So I gave washing disposable wipes a go and hallelujah! they wash beautifully – actually end up a bit softer than brand new. I just buy a store brand wipe, nothing special and put them in with a load of nappies, I find I can wash them 5-6 times before they fall apart which gives me great value for my buck. I make my own nappy wipe solution for them as well.

Home Made Wipes

1 litre of boiling water

1 chamomile teabag
¼ cup of apple cider vinegar (white vinegar will do)2 drops of Lavender Oil or teatree oil (optional)
Handful of Marigold/Calendula Flowers (optional)
A few drops of hypercal tincture (this is optional but excellent for healing)

I just mix it all together, pour it over the folded wipes into a plastic container (icecream is fine but I use a commercial wipes containers made by a well known brand) and once cooled drain off any excess and use as standard. The vinegar stops the whole lot from going smelly and also has an antifungal effect whilst the chamomile and marigold are very soothing and healing on little bums. The lavender oil is good for the skin and adds a nice smell  while teatree oil is antifungal but I am wary of using large amounts as there is some limited evidence to suggest that certain elements in the oil can interfere with baby hormones.

Home made Wipes with Oil

1 litre of boiling water
1/4 cup vinegar
1/4 cup calendula oil or olive oil

Mix together as above, the oil is helpful to babies who have dry skin or when you have a dried on sticky mess to clean off. If you use cloth wipers like muslins or flannels then you can keep the wipes mix in a squeezy bottle and use as needed.


On the subject of things we put on baby bums I had been a little put off by all of the creams and unguents out there for nappy rash, even a simple barrier cream seems to have a lot of chemicals and Vaseline which is one of the simplest and most common products out there is a by-product of the petroleum industry All of these things contain pthalates which are serious hormone interrupters and are especially risky to small babies and their development. I had been looking into a nice looking natural balm made of beeswax and oil but the cost to purchase it put me off at $18 a tub it just wasn’t going to work out dollar wise. So I investigated making my own balm out of beeswax and olive oil.


I make the balm by melting the wax in a thick bottomed pot at a very low heat and stirring in the oil. Once everything is combined I let cool a little before pouring into glass jars or ceramic containers. Old sugar bowls or cups work well. I try to avoid plastic containers as they can leach oestrogens and BPAS when warmed up. The resulting balm is fabulous on little bums and I also use when I massage my wee man as it’s better than a drippy oil which gets everywhere. If you are using cloth nappies you might find it causes a bit of a build up on the nappy, which can be avoided by using liners (rewashable ones are best) or doing an occasional warm wash. It’s best to use is sparingly anyway to avoid build up. I personally use olive oil as it is not derived from nuts (for possible nut allergies) and is fabulous on skin, it’s also one of the cheapest options to use. This balm is also great for dry legs, cracked feet, gardening hands and even sore boobs - although wash off before the hungry mouth goes on and be careful of cross contamination!


Basic Balm Recipe:
1 part beeswax
8 parts olive oil (any other carrier oil will do)

Melt the beexwax and oil together before stirring gently and pouring into pots. You don't want to let the mixture get too hot as it will denature the oil and possibly crack your jar.

Soothing Balm Recipe:
As for the basic recipe but add a few drops of Lavender oil  just before pouring into pots, I use Pacific Blue genus of lavender as it is very low in camphor and suitable even for very small babies.

Antifungal Balm Recipe:

As for the basic recipe but add a further 2 parts of virgin coconut oil and a few drops of manuka or teatree oil just before pouring out.


I order my beeswax online from Happy Valley, they have a great online shop and you can get biogro organic options. The minimum order is 1kg which comes in 200gm blocks.

One of the other things you end up using a lot of is talcum or baby powder, and it seems like yet another opportunity to splash unnecessary chemicals onto our babies nethers, not to mention talcum powder can get into baby’s lungs and cause serious breathing issues. A much simpler and cheaper option is standard ordinary cornflour. I just put it in a shaker and use liberally on wee monster's bum. It seems to keep him a lot drier and more comfortable – it’s a great home remedy for nappy rash, although don’t use it if you think there is a thrush infection as the yeasts feed on the cornstarch. A rash that has a thrush infection tends to sit in the creases and should be treated entirely differently to a standard rash.

I never used to be serious about the products on my skin, I used to believe that if they sold it especially for babies that it must be fine. But that is simply not the case, they do not do long term testing nor do they do cumulative testing. You never know what the cocktail of chemicals we regularly put on our skin will do, so why trust the people who depend on you buying their stuff for the information?