Health Advisory

Nothing within this blog should be considered as medical advice and you should always consult your preferred medical professional.

Search This Blog

Showing posts with label coconut milk. Show all posts

Tuesday, June 12, 2012

Icecream - Good for what ails you


My big boy is going through a notoriously picky eating stage, he has gone from being an adventurous devourer of everything to a selective grazer. I try not to stress out about it, everyone tells me it is a totally normal stage relating to palate and autonomy but I still get anxious and worry about nutrition. I swore I would never become one of those mothers who sneakily find 101 ways to hide spinach in everything but I am heading in that direction.


One thing that he never turns down is icecream! As a result I have developed a series of cunning ‘icecream’ recipes that help give him his 8+ a day. Currently he is avoiding meat and has an uncanny ability to detect and discard it. Which has led me to worry about his iron stores, he has a been a bit pale and tired lately and when I checked his eyelids they were a little pale so I decided to up his Vitamin C and iron intake. A tricky proposition when he has become bored of citrus fruit and refuses to eat his greens. As a result I have come up with some delicious smoothie recipes that become even more delectable icecreams.

To make these you need a blender and an iceblock mould as well as some popsicle sticks.. oh and a freezer.

Green Martian Pops – rich in vitamin C and iron

2 kiwifruit
Bunch of parsley
Kale if you have it
1 teaspoon spirulina powder
½ banana
1 teaspoon of manuka honey
Enough water to make it all blend

It’s important for optimum iron absorption to avoid adding milk or dairy products, I punched up the iron value by adding some floradix and the kiwifruit which is rich in vitamin C helps to absorb the maximum amount of iron. The banana helps make everything creamy and the honey makes it more palatable as well as making the ice crystals smaller. Sugar inhibits freezing which makes the end result easier to eat. A lot of people worry about savoury greens going into a sweet icecream but it’s amazing how well they mix in and how yummy they taste.

Coconut Yummies – a neat way of getting healthy fats in

1 can coconut cream
1 tablespoon virgin coconut oil
1 whole banana
1 teaspoon cinnamon
1 teaspoon manuka honey
8 fish oil capsules or 2 teaspoons of fish oil
½ can mango slices or one whole fresh mango (optional)

These sound a little revolting but something about the coconut cream, banana and cinnamon manages to emulsify and obscure the fish oil. Fish oil is great for little brains and this is a handy way of getting a dose in. The fish oil I get is tested for mercury and includes Vitamin D so is a fabulous immune booster in the winter months. Cinnamon is a great blood sugar regulator as well. If you have a child with gut issues then this is a great smoothie recipe to incorporate slippery elm which helps to line and protect the GIT

Real Fake Jellytip – my son loves these because they taste kinda like jellytip but oh so much better for you. Rich in vitamin C!

3 handfuls of frozen raspberries
1 teaspoon of honey
½ cup beetroot juice
2 juiced oranges
Zest and juice of one lime

I use this mix to make red ‘tips’ on other flavours. It’s a great way of bringing back a waning interest in other icecream flavours. It is a tangy delicious combo that I find hard to resist myself.

Tummy bug pops – gentle on sore tums and great for rehydrating along with fluids

1 can green coconut water (not to be confused with coconut milk)
1 banana
1 handful of blueberries
1 teaspoon squeezed juice from some grated ginger

Ginger helps with nausea and green coconut water is ideal for rehydrating because of its similarity to blood plasma. Green coconut water is brownish coloured, and not at all creamy, it also tastes a bit like arse but made into a smoothie it’s much more palatable. Banana is gentle on the tummy and helps with tender bellies, it is part of the B.R.A.T diet and suitable for reintroducing solid foods after a bout of the guts. Blueberries are a powerful antioxidant as well as a good source of potassium which is essential when rehydrating. These are great to make up and then have in the bottom of the freezer for cases of dire rear.

Chocsicles – a probiotic powerhouse

1 banana
1 avocado
½ cup kefir or yoghurt
1 heaping teaspoon raw cacao
1 teaspoon manuka honey

Probiotics are great at preventing illnesses and restoring balance, fabulous for taking after a course of antibiotics. Freezing probiotic foods don’t kill all of the probiotics – simply slow them down. There is a bigger benefit of simply feeding the smoothie but iceblocks are a really handy way of doing it.

These recipes are all just ideas, of course there are thousands of variations you can use. I often make up smoothies with whatever is going and freeze them up in batches. Changing the colours and flavours on a regular basis keeps him interested. These iceblocks are usually served for dessert and in the bath! Sometimes they become impromptu wall crayons but most of the time they are devoured with glee.


Friday, March 16, 2012

Pediculosis capitis – say what now?


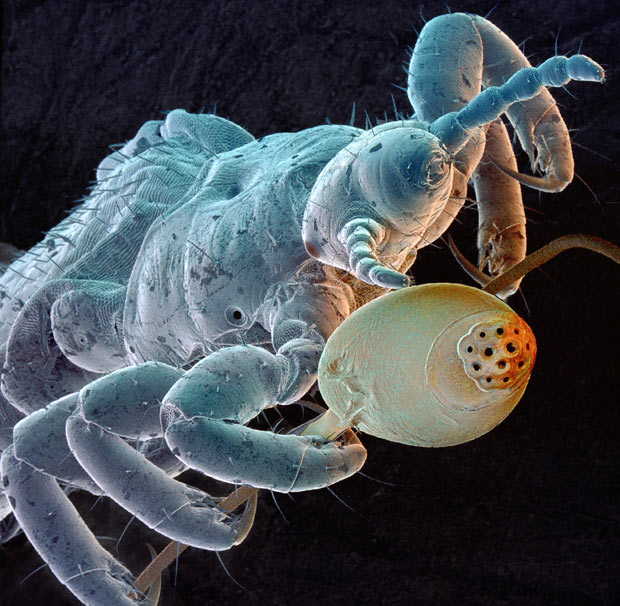
Headlice are ‘orrible. They are the bane of any parents with children who engage in social activities. They are very small parasitic wingless insects that live on the scalp of human beings. They have six legs, each with strong claws to hold tightly to the hair or scalp and range from near transparent white to dark brown. Head lice lay eggs called Nits.  The Nit eggs are yellowish white and oval-shaped.  Nits are attached to the shafts of the hair close to the scalp so they are kept warm in order to incubate. Ewwww. The eggs of head lice hatch in about 7-10 days. The egg-to-egg cycle is about 3-4 weeks. The eggs are resistant to most treatments and cannot be washed out – you can see what we are up against. 

Headlice, not the next great toy


Treating once will only kill the live nits and because they transfer effectively from head to head contact, clothing and linen, a deep infestation can be almost impossible to clear.

A little note came up at preschool a few weeks ago, ‘WARNING WE HAVE NITS’ and they even helpfully put up a laminated example of a real nit and a real louse.  I instantly got the heeby jeebies. I felt itchy right away but couldn’t itch myself for fear of looking like a lice infested hobo. My head had been itchy anyway due to the 3 month post partum moult but now with every itch I imagined a horde of shiny little bodies crawling over my head. Every night I badgered my husband to check me for lice and I have been watching my son like a hawk to see if he itches.
With lice, prevention is always ALWAYS better than cure, but before you assume all the louse ridden children are poor, undernourished and unclean you should know that headlice prefer clean scalps and nice juicy children (okay I just invented that last supposition but it makes sense). Since my son is clearly nit free I can safely assume he has a nice grubby scalp


How do you prevent headlice?

Aside from having dyed hair (not an option for most kids) and leaving your hair dirty (probably a preferred option with most kids) there are a couple of things you can do to make your childs head less tenable. With short hair, putting gel or product in it before your children are likely to be in head lice contact is a cunning move and with long hair, tight plaits or tied up hairstyles with hairspray are effective too. Another tactic is to make sure children are not sharing hats or hairties.

Here is a recipe for home made, louse resistant, chemical free hairgel/spray you can make for pennies.

Manuka Hair Gel Recipe
2 teaspoons of powder gelatine (not heaped)
300ml warm water
1 tablespoon white vinegar
12 drops of manuka oil – you can also use teatree and add some lavender oil if you wish.

Mix the water, vinegar and gelatine together until dissolved and wait until it has set. Once it has set put it in your blender and blitz it whilst adding your essential oil. It should come out smooth like hair gel. To make it into a hairspray dissolve ½ a cup in 300ml of water approx and put into a spritzer bottle.

Ideally this will stop the lice in their tracks but assuming the lice are more persistent than that and you end up with an infestation you can still get rid of them without something toxic or nasty. In past days children would have been simply lined up at school and had their head dunked in a bucked of kerosene This is not to be recommended and can seriously burn the scalp.

First off how do you know if your child has lice?

Sometimes it can be hard to know. Most kids will be itchy and irritable, there may be red spots on their scalp which can become infected.It’s also possible for your child to have a headache, general malaise and even a rash or allergic response such as hives. In many cases however there may be no obvious signs of an infestation.

To check for lice you will need a comb and a bright light such as daylight or a torch to check the scalp. The nits or eggs are little white dots that sit on the hair shaft and the lice are little brown critters that dash across the scalp. Wetting the hair immobilises them and can make it easier to spot them. My mum used to sit me out in a sunny spot and check my scalp and pop any lice she found. All we needed were chimp suits. As an interesting note, girls are more prone to headlice than boys are. 


So what do you need to kill the headlice?

Some white vinegar or apple cider vinegar
Some coconut milk (optional)
Some oil, olive or almond are best
Some teatree oil or manuka oil.
A nit comb

To treat headlice you need to commit to doing a few treatments over a 12 day period, this is because any nits or eggs you miss will hatch and start the whole cycle again and it’s easier to get them all in one fell swoop than to wait for each successive reinfestation. You also need to do every one in the house and you need to do the bedding and recently used clothes as well.

The first step of the treatment is to douse the hair in vinegar and leave for about half an hour, either with a spritzer bottle or using a flannel soaked in vinegar. A headband around the forhead and over the ears like a skier is a good way to stop drips from getting in eyes. It can stink like billy’o! Vinegar breaks down the glue which holds the nits onto the hair and can also help weaken or kill the lice.

The second step of the treatment is to mix 1 part coconut milk with 1 part oil and some drops of teatree oil and smother the whole head in this mix. The coconut milk makes it smoother and easier to comb later on. You need to leave this mix in for as long as possible. You can glad wrap it overnight if your children are a bit older and will tolerate it but for little children you may just have to deal with a goopy head for as long as you can manage. Even a little hat can hep the mix stay on. This blend smothers the lice and immobilises them.

The third step is to patiently comb all of the nits out using a nit comb, the easiest way is to divide it up into sections and comb it out piece by piece using an absorbent towel to collect the oil mix and hopefully the dead lice. Once this is completed it’s time for a nice hot hair wash and condition with a final rinse of vinegar (which makes you hair lovely and soft anyway).

If you don’t have oil and coconut milk you can use conditioner with a few drops of teatree or manuka oil in it. This is easier to comb and is just as good at smothering, but it is not terribly natural. It depends entirely on what hair regime you have.

Another tip is if your child has long hair and you have a straightening iron you can use the hot iron to straighten their hair and sizzle all of the headlice. You have to know that your child can sit still though… I cannot stress how important that is.


The fourth step is just as important, and that is to wash all of your linens, preferably on a hot wash with some teatree or manuka oil and then out through a hot cycle in your dryer or hang on the line for at least 2 days. Anything that can’t be washed can be bagged up and sealed which starves the little critters to death.

You can also get electric combs which zap them to death, which is significantly less fussing and bother especially with little children. However they don’t kill the nits so you will need to do it every couple of days for a fortnight and they are also expensive!

I forgot to mention the last part of the cure, a glass of wine to help soothe your nerves after the ordeal. This is possibly the most essential step.